The use of IPSEC transport mode for server to server communication is one of the best solutions to provide authentication, integrity, access control, and confidentiality. IPSEC is built into to the Linux kernel, in other words there is no daemon running in the background. IPSEC does not require port-forwarding; some people elect to use SSH, stunnel, and other technologies that rely on port forwarding. With IPSEC, you simply have to run a program and its configuration file. After running it, encryption between hosts is mandatory. Connections will be denied if the other connection does not have the appropriate keys. Groups of computers can share the same key, and it can even be done on a per-port setting.
To configure the IPSec between servers following are the requirements:
- IPSec-tools package
- Static IP address for each system
IPSec-tools can be downloaded from http://ipsec-tools.sourceforge.net/.
Installation IPSec-tools package:
To install give the following commands:
# tar jxf ipsec-tools-x.y.z.tar.bz2
# cd ipsec-tools-x.y.z
# ./configure
# make
# make install
If you get error in compilation, please go through the comments. You will find the solution.
Replace x.y.z with the version of the downloaded sources.
Instead of compiling and installing IPSec-tools from source, it can be done using CentOS repository:
# yum install ipsec-tools
IPSec communication between two Linux systems
Using Pre-shared key authentication method:
Linux to Linux IPSec communication can be used to secure the communication between Server (IP address: 192.168.1.1) to Server (IP address: 192.168.1.2). It can also be used to encrypt the client-sever communication. For example: L2TP VPN Server and client communication, VNC server and client communication can be secured using ipsec-tools. For both cases following steps need to be followed.
The first step is to write a configuration file /etc/raccoon/setkey.conf with following entries on 192.168.1.1.
#!/usr/sbin/setkey -f
# Flush the SAD and SPD
flush;
spdflush;
spdadd 192.168.1.1 192.168.1.2 any -P out ipsec
        esp/transport//require;
spdadd 192.168.1.2 192.168.1.1 any -P in ipsec
        esp/transport//require;
The same /etc/setkey.conf can be created on the 192.168.1.2 host, with inverted -P in and -P out options.
#!/usr/sbin/setkey -f
# Flush the SAD and SPD
flush;
spdflush;
spdadd 192.168.1.1 192.168.1.2 any -P in ipsec
        esp/transport//require;
spdadd 192.168.1.2 192.168.1.1 any -P out ipsec
        esp/transport//require;
With the security policies set up you can configure racoon. We will add paths for the preshared key file, and certification directory. This is an example of /etc/racoon.conf with the paths and a general phase two policy set up:
path pre_shared_key "/etc/racoon/psk.txt";
path certificate "/etc/racoon/certs";
sainfo anonymous {
{
        pfs_group 2;
        lifetime time 1 hour;
        encryption_algorithm 3des, blowfish 448, rijndael;
        authentication_algorithm hmac_sha1, hmac_md5;
        compression_algorithm deflate;
}
The sainfo identifier is used to make a block that specifies the settings for security associations. Instead of setting this for a specific host, the anonymous parameter is used to specify that these settings should be used for all hosts that do not have a specific configuration. The pfs_group specifies which group of Diffie-Hellman exponentiations should be used. The different groups provide different lengths of base prime numbers that are used for the authentication process. Group 2 provides a 1024 bit length if you would like to use a greater length, for increased security, you can use another group (like 14 for a 2048 bit length). The encryption_algorithm specifies which encryption algorithms this host is willing to use for ESP encryption. The authentication_algorithm specifies the algorithm to be used for ESP Authentication or AH. Finally, the compression_algorithm is used to specify which compression algorithm should be used when IPcomp is specified in an association.
The next step is to add a phase one configuration for the key exchange with the other host to the racoon.conf configuration file.
remote 192.168.1.2
{
        exchange_mode aggressive, main;
        my_identifier address;
        proposal {
               encryption_algorithm 3des;
               hash_algorithm sha1;
               authentication_method pre_shared_key;
               dh_group 2;
        }
}
The remote block specifies a phase one configuration. The exchange_mode is used to configure what exchange mode should be used for phase. You can specify more than one exchange mode, but the first method is used if this host is the initiator of the key exchange. The my_identifier option specifies what identifier should be sent to the remote host. If this option committed address is used, this sends the IP address as the identifier. The proposal block specifies parameter that will be proposed to the other host during phase one authentication. The encryption_algorithm, and dh_group are explained above. The hash_algorithm option is mandatory, and configures the hash algorithm that should be used. This can be md5, or sha1. The authentication_method is crucial for this configuration, as this parameter is used to specify that a preshared key should be used, with pre_shared_key.
With racoon set up there is one thing left to do, the preshared key has to be added to /etc/racoon/psk.txt. The syntax is very simple, each line contains a host IP address and a key. These parameters are separated with a tab. For example:
192.168.1.2 somekey
Now time to test the security policies & raccoon configuration.
$ setkey -f /etc/setkey.conf
$ racoon -F
For instance, you could ping the other host to start with. The first time you ping the other host, this will fail:
$ ping 192.168.1.2
connect: Resource temporarily unavailable
But after some time you will get reply. Now all the communication between IP addresses 192.168.1.1 and 192.168.1.2 is secured with IPSec. Instead of making complete secure communication, it can be changed port specific, which can be used for client-server secure communication. It just need to modify /etc/setkey.conf file for port specific configuration.
Check related posts: how to configure L2TP VPN on CentOS using rp-l2tpd and how to configure L2TP VPN on CentOS using xl2tpd


I would like to express some thanks to the writer for bailing me out of this particular dilemma. As a result of researching throughout the world wide web and getting strategies which are not productive, I was thinking my life was over. Existing minus the approaches to the difficulties you have fixed by way of your entire site is a critical case, and the kind that could have adversely affected my entire career if I had not come across your web site. Your own personal mastery and kindness in maneuvering a lot of stuff was invaluable. I don’t know what I would have done if I had not encountered such a point like this. It’s possible to now look forward to my future. Thank you so much for the skilled and amazing guide. I won’t hesitate to recommend your blog to any individual who should receive guidelines on this situation
Thanks :-)
This is difficult to find out unless you try it out.
Finally, users should subtract the figures while not
using a VPN connection from the data while they were connected.
You should always try getting as much information
as possible about the provider before subscribing.
You wrote:
The same /etc/setkey.conf can be created on the 192.168.1.2…
Didn’t you mean:
The same /etc/raccoon/setkey.conf can be created on the 192.168.1.2 ?
Yes, if your setkey.conf is in /etc/raccoon directory. Both system can have same setkey.conf file.
may i know how to create pre_shared_key….?
Preshared key has to be added to /etc/racoon/psk.txt. The syntax is very simple, each line contains a host IP address and a key. These parameters are separated with a tab or space. For example:
192.168.1.2 somekey
Replace “somekey” with the password (plain text) of your choice.
Thank you for the excellent post. As a heads up I was getting a compile time error with GCC 4.4 which uses strict aliasing. As a work around do the following before configure (this is in CentOS 6.4)
export CFLAGS=”-fno-strict-aliasing”
Hi Charles,
Thanks for feedback and solution. :-)
Hello, This is a great step-by-step guide… But i’m missing something.
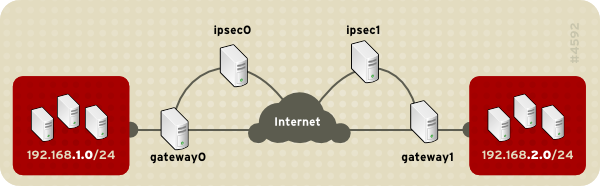
You talk about networks 192.168.1.1 and 192.168.2.1, which (I assume) are behind either gateways. And this is what you set up on the configs, correct?
My question is: Where do you setup the PUBLIC addresses for each gateways? With this setup I understand both networks will be able to “see” each other by way of the gateways, but I don’t see where the public IPs are setup…
Thanks!
This post is a how to of a simple configuration of ipsec. But you can configure it as showing in diagram with this method. Please use the public IP addresses in the ipsec configuration instead of private IP 192.168.1.1 and 192.168.1.2 given in this post.
In this case your ipsec devices will also communicate directly on public IP addresses and real clients will communicate through gateways.
All the best :-)
well the stuff like this really made me interested in your blog..
Hi Apoorv,
Thanks for showing your interest on my blog. :-)
I also like your blog’s contents, you are a creative writer, hope you will continue this thing.
All the best.
Pingback: Centos L2tp Server | Kuplux's
Pingback: Centos L2tp Server | 寒星晓月
Yes! Finally something about click here.
I must say i really liked this, looked arround for some how-to to do this setup for ages but couldnt find anything. But i do have a small problem at the very end of it. When i run setkey -f /etc/setkey.conf i get the following error
pfkey_open: Address family not supported by protocol
Can’t find what is causing this, i’m using the public IP of 2 remote hosts to make the configuration, all the rest is exactly the same. Any tip?
Thanks for liking :-)
The error you are seeing might be generating because of missing some kernel module. That might be “esp” and supporting modules, if you are using same conf file as mine.
Use command:
modprobe esp
Wow that was faster than i expected, thanks
FATAL: Module esp not found.
Also saw someplaces recommending modprobe af_key but i also get
FATAL: Module af_key not found.
Looks like i’ll have to recompile the kernel right? I’ll have to wait tomorow for that cause i don’t think i can do that myself and the host support is offline atm. Do you think the steps mentioned here (http://www.ipsec-howto.org/x299.html) will be enough to compile it with what i need?